


Master's Research Project:
Paternal Preconception Health

Tools: Adobe After Effect, Adobe Illustrator, Procreate Dreams, Autodesk Maya, Procreate, Adobe Audition, Adobe Premiere Pro
BMC Supervisors: Prof. Nicholas Woolridge & Dr. Shelley Wall
Content Advisor: Dr. Deborah Sloboda
Target audience: 28-38 year old biological males
Timeline: April 2025 - August 2026
What's the problem currently?
The vast majority of existing educational resources about healthy pregnancies are targeted toward the female partner, and male partners are rarely targeted in the promotion of lifestyle changes. As a result, there exists a communication gap and lack of awareness about the importance of preconception health for men.
Goals of the project:
-
Conduct informal interviews with the target audience and understand the communication gaps in terms of scientific knowledge and the media preferences.
-
Communicate about paternal preconception health and the biological pathways that govern it, a topic which is sparingly communicated, through a 2D/3D animation
-
Improve biological males’ understanding about the importance of their preconception health, discussing how lifestyle and diet factors affect sperm and seminal fluid health.
-
Help create a discussion around this topic and minimize the burden of pregnancy from biological females.

Anticipated Significance:
• The animation will be uploaded on official social media websites of Dr. Sloboda's lab, allowing for more exposure and communication surrounding this topic
• Dr. Sloboda will incorporate this animation into a research study and prenatal nutrition classes run in the city of Hamilton Public Health Services
Timeline
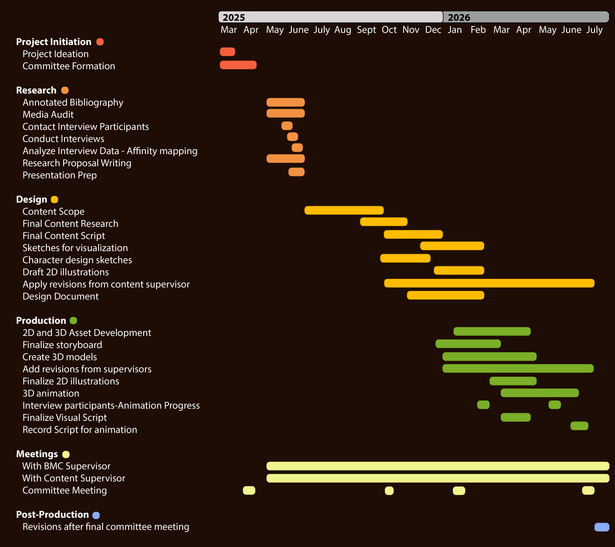
This project was over a year long, starting in April 2025 and ending in August 2026. The research and pre-production stages were done between April 2025 - December 2025. The full production was done from January 2026 - August 2026.
Click on a button to skip to that section!
Research
Prior to visualizing anything for the project, the first step was to understand the science surrounding this topic! I read lots of literature surrounding the primary research and literature reviews done on paternal preconception health and epigenetics. The most difficult part was reading all the research and being able to break it down into different sections.
After the initial committee meeting, it was decided that I would create a 2D/3D animation. I then did literature analysis on the effect of educational animation surrounding my project topic. As seen on the right, I also did a media audit to review the existing communication resources available to public.
Read the full project proposal here!


User Interviews
The first step in this project was to understand the knowledge gaps held by biological males between 28-38 years. I interviewed 12 biological males from this age range. I designed the questions keeping 2 things in mind: the participants come from various backgrounds and that most of them have never been positioned as active participants in reproductive health. I met them where they were rather than assuming where they should be.
These interviews were conducted via Zoom and Whatsapp during June - July 2025.
Interview analysis
Interview responses were organized and the data was analyzed using affinity mapping. The clusters that emerged from the results revealed four core knowledge gaps that structured the animation's narrative:
1. What is epigenetics?
2. What environmental factors affect sperm and seminal fluid quality from epigenetics?
3. How does impacted sperm affect placenta development during pregnancy?
4. What lifestyle changes should men make prior to conception?


Pre-production
The pre-production stage followed a typical linear animation workflow. I first started by writing a treatment where I imagined the entire animation visually and wrote the initial flow. Then I wrote the initial version of the script while simultaneously creating a storyboard. The script ultimately went through 8 versions, with revisions from my entire committee to make it at a grade 9 comprehension level, in non-intimidating and conversational language to ensure it was accessible to the lay audience.

Treatment:

Frames from first version of storyboard:
Storyboard - version 1:


A monochromatic colour scheme was chosen based on the initial interviews to avoid overwhelming the viewer.

From analysis of the interviews, we concluded it's best to include a personal feel to the video by adding characters. I had discussed with my content advisor about including a character that looks neutral. The difficulty came with how to best incorporate the characters into the storyline. We also did not make the female character pink in the end and included it as an equal to the male character in the animatic. There was also some interest in including metaphors within the storyline - such as the key and lock metaphor for the male character "discovering" new knowledge, however at times it didn't add to the storyline, rather added confusion. Thus, the story was made simpler without the addition of abstract ideas.
View the final animatic:


Usability Testing
By keeping the audience in mind before committing to full production, I returned to my audience for a second round of user-testing, by screening the animatic and filling out a post-animation worksheet. Questions about visual style asked directly after showing animation revealed which visuals worked well and which areas were confusing. By going through this user-testing, I was able to view my animation through a different lens - through the eyes of my user again. The results also confirmed the narrative, tone, design style and knowledge fulfillment.

Post-animation worksheet:


Affinity mapped the answers to understand common themes

Read the full usability test report here:


From the interview analysis:
What was confirmed: Users clearly defined epigenetics and its significance on sperm health, identify specific environmental factors affecting sperm and explain what a placenta is and how sperm health affects placental development.
What needs refinement: Users felt the character was a good addition, but sometimes confusing. Using multiple visual cues when complex biology appears.
Production
After many months of important work done in the preproduction stage - researching, user testing (twice!), finalizing design styles and script, I was ready to move on to the part where I can see it all come to life! I knew from the beginning the style of the video would have a line boil or hand-drawn feel to create a sense of comfort.
I also challenged myself with this project to try out different animation styles such as frame-by-frame hand-drawn animation using Procreate Dreams, 2D animation on After Effects and 3D animation using Maya.
3D assets
I first started with the 3D modelling of the sperm and the fallopian tube. The challenge with this scene was figuring out all the camera movements within this small space - which took lots of time and help from Prof. Marc Dryer! I wanted the feel of this scene to be dramatic and immerse the viewer in the space.


Initial textures and colours of the tube and egg:
Final textures and colour of egg:
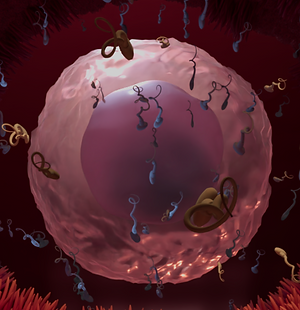
The egg started looking like a foreign object here so my content advisor suggested a similar colour scheme to the tube.
Final DNA and epigenetic tags representations compared to storyboard frames:

The DNA was also created in Maya and a toon shader was added to give it the 2-dimensional look - to match the hand-drawn feel of the entire animation. To represent epigenetic markers, my content advisor and I agreed on using "tags" that are attached to the DNA. As this animation is for a lay audience, we made sure the imagery of the scientific components was not confusing or overwhelming, thus simple representations like this help mitigate that worry. I used this DNA as much as possible during the explanation of epigenetics.
2D assets
Assets created in Procreate:
The placenta was drawn with a simplified cross section, only showing the necessary details.


Assets created in Adobe Illustrator:


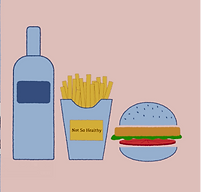

Some of the assets were created in 2D to mimic the 3D versions such as for the egg and sperm:
Hand-drawn frame-by-frame animation
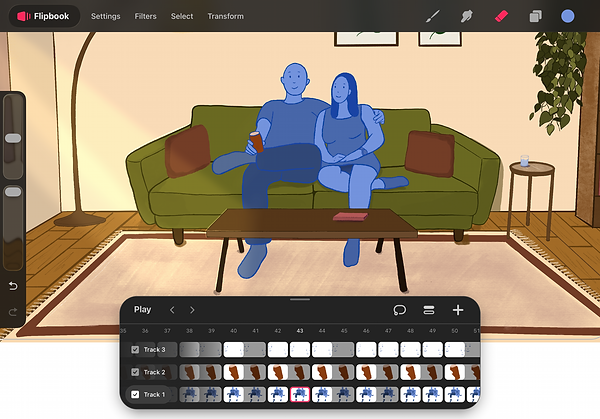
The entire workflow for the frame-by-frame animation was completed on Procreate Dreams. This was a new software for me that required fast learning in a matter of 3 months. As the user interface for Procreate Dreams is relatively similar to Procreate, it was easier to pick up in a short time. For the character animation, I recorded videos for character reference first, then I used rotoscoping. Overall, the task was tedious but I was very happy with the style and organic feel of the characters.
In Procreate Dreams, I first did the line work of the characters, frame-by-frame and then after I was satisfied with the animation in line-work, I moved onto colouring the frames.
Line work in Procreate Dreams:

Compositing in Procreate Dreams:

Colourization in Procreate Dreams:
Compositing in After Effects:

The compositing was also done in Procreate Dreams. The video from here was brought into After Effects for compositing as a .MP4. The colour space was different when compositing in After Effects due to Maya .exr files being composited in the same file, thus an adjustment layer was added during exporting.

Walk cycles in Procreate Dreams:

The walk cycles were also done using rotoscoping. For the two walk cycles, first a rough sketch version was completed for approval from my committee. Then it was followed by clean line work and then colourization of the character. I was very excited to practice hand-drawn walk cycles for my animation but in the end, it was a very tedious task that ended up taking me about 8 hours each!
Adobe After Effects animation
A part of the animation that I am most proud of is using the Trapcode Particular system in After Effects to create the sperm moving around and applying the 'emboss' effect to make it look like it's being viewed under a microscope. With the help of Prof. Marc Dryer, I was able to set up the system by using 'feeding time' built-in template in After Effects and manipulate the settings to create healthy sperm, large head sperm, sperm with no tails, and double head sperm.
Testing with different colour variations:


Clip from final animation:
The music and sound effects were taken from free sources and added to the final animation using Adobe Premiere Pro. Overall, I am so grateful to have worked on this project. I learned SO many skillsets in a span of a year that will only benefit my future. This project couldn't have been completed without the help of my wonderful committee members and Prof. Marc Dryer for all their advice, guidance, and technical and research support. The amount of effort I put into this project is the reason it is my biggest accomplishment - because I have learned so much about the animation workflow and about myself along the way!